In this section, we are going to prepare the interface definition document, called cmas2d_customlib_default.spd.
This file is in XML format and contains all the definition of all the data necessary for the analysis.
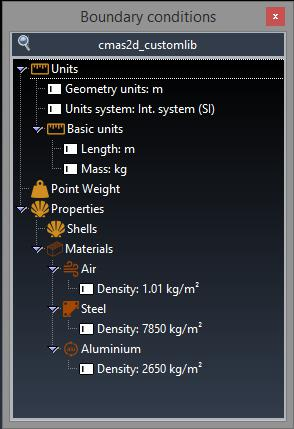
First of all, let's see the final result:
Step by step. The first we see is Units. It's useful to set a global criteria, such as the geometry units, or the default units system.
The next is Point Weight, to assign concentrated mass to a group that contains points. The spd code for this condition is:
<condition n="Point_Weight" pn="Point Weight" ov="point" ovm="node" icon="constraints" help="Concentrated mass">
<value n="Weight" pn="Weight" v="0.0" unit_magnitude="M" units="kg" help="Specify the weight that you want to apply"/>
</condition>
Let's introduce some concepts. The 'condition' tag is used to assign properties to groups. The properties are defined in the 'value' tags inside the container. For example, there is the property called 'Weight'. We can specify which entity is allowed (point, line, surface and/or volume) in the 'ov' field of the condition. For further information, check the customLib description of fields in the Customization Manual.
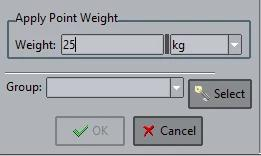
When we 'double click' on Point Weight, we can see this window, to assign a weight to a group, that can be created by clicking on the Select button. This will allow us to select some points in the geometry. The condition will be applied after selection the points and clicking the Ok button.
In the tree, below the 'Point Weight' entry, we find 'Properties', a folder or 'container', that contains 'Shells' and 'Materials'. It's code is:
<container n="Properties" pn="Properties" un="Properties" icon="shells" help="Define your materials database and apply them to the surfaces of your problem">
<condition n="Shells" pn="Shells" ov="surface" ovm="element" icon="shells" help="Select your material and the surfaces related to it">
<value n="material" pn="Material" editable='0' help="Choose a material from the database" values_tree='[GetMaterialsList]'>
<edit_command n="Edit materials" pn="Edit materials" icon="material" proc='EditDatabaseList'/>
</value>
</condition>
<include path="xml/materials.xml"/>
</container>
There is a 'container', another 'condition' called Shells, and a special 'value' called material. In this section, we want to assign a material from the database to a surface (see 'ov' field on the condition).
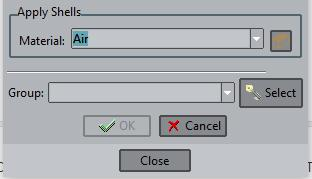
By 'double clicking' on Shells, we get a window like this:
After selecting the surfaces you want to assign this condition, press the Ok button to confirm this assignment.
In the Properties container code, we can see that it includes a file. The customLib library allows splitting the spd in different parts. You can find the materials database in the included file, in the same problemtype folder.
GiD - The personal pre and post processor
General
Content
Integrations


