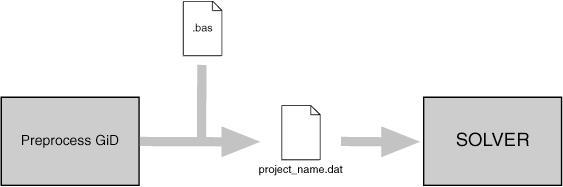
Once you have generated the mesh, and assigned the conditions and the materials properties, as well as the general problem and intervals data for the solver, it is necessary to produce the data input files to be processed by that program.
To manage this reading, GiD is able to interpret a file called problem_type_name.bas (where problem_type_name is the name of the working directory of the problem type without the .bas extension).
This file (template file) describes the format and structure of the required data input file for the solver that is used for a particular case. This file must remain in the problem_type_name.gid directory, as well as the other files already described - problem_type_name.cnd, problem_type_name.mat, problem_type_name.prb and also problem_type_name.sim and ***.geo, if desired.
In the case that more than one data input file is needed, GiD allows the creation of more files by means of additional ***.bas files (note that while problem_type_name.bas creates a data input file named project_name.dat, successive ***.bas files - where *** can be any name - create files with the names project_name-1.dat, project_name-2.dat, and so on). The new files follow the same rules as the ones explained next for problem_type_name.bas files.
These files work as an interface from GiD's standard results to the specific data input for any individual solver module. This means that the process of running the analysis simply forms another step that can be completed within the system.
In the event of an error in the preparation of the data input files, the programmer has only to fix the corresponding problem_type_name.bas or ***.bas file and rerun the example, without needing to leave GiD, recompile or reassign any data or re-mesh.
This facility is due to the structure of the template files. They are a group of macros (like an ordinary programming language) that can be read, without the need of a compiler, every time the corresponding analysis file is to be written. This ensures a fast way to debug mistakes.PROBLEMTYPE 'CLASSIC'>Template files>Commands used in the .bas file
List of bas commands: (all these commands must be prefixed by a character *)
Add
Break
Clock Cond CondElemFace CondHasLocalAxes CondName CondNumEntities CondNumFields
ElemsCenter ElemsConec ElemsLayerName ElemsLayerNum ElemsMat ElemsMatProp ElemsNnode ElemsNnodeCurt ElemsNNodeFace ElemsNNodeFaceCurt ElemsNormal ElemsNum ElemsRadius ElemsType ElemsTypeName Else ElseIf End Endif
FaceElemsNum FaceIndex FactorUnit FileId For Format
GenData GlobalNodes GroupColorRGB GroupFullName GroupName GroupNum GroupNumEntities GroupParentName GroupParentNum
If Include IntFormat IntvData IsQuadratic
LayerColorRGB LayerName LayerNum LayerNumEntities LocalAxesDef LocalAxesDefCenter LocalAxesNum LocalNodes Loop LoopVar
MaterialLocalNum MatNum MatProp MessageBox
Ndime Nelem Nintervals NLocalAxes Nmats Nnode NodesCoord NodesLayerName NodesLayerNum NodesNum Npoin
Operation
RealFormat Remove
Set SetFormatForceWidth SetFormatStandard
Tcl Time
Units
WarningBox
PROBLEMTYPE 'CLASSIC'>Template files>Commands used in the .bas file>Single value return commands
When writing a command, it is generally not case-sensitive (unless explicitly mentioned), and even a mixture of uppercase and lowercase will not affect the results.
- *npoin, *ndime, *nnode, *nelem, *nmats, *nintervals. These return, respectively, the number of points, the dimensions of the project being considered, the number of nodes of the element with the highest number, the number of elements, the number of materials and the number of data intervals. All of them are considered as integers and do not carry arguments (see *format,*intformat), except *nelem, which can bring different types of elements. These elements are: Point, Linear, Triangle, Quadrilateral, Tetrahedra, Hexahedra, Prism, Pyramid, Sphere, depending on the number of edges the element has, and All, which comprises all the possible types. The command *nmats returns the number of materials effectively assigned to an entity, not all the defined ones.
- *GenData. This must carry an argument of integer type that specifies the number of the field to be printed. This number is the order of the field inside the general data list. This must be one of the values that are fixed for the whole problem, independently of the interval (see Problem and intervals data file (.prb)). The name of the field, or an abreviation of it, can also be the argument instead. The arguments REAL or INT, to express the type of number for the field, are also available (see *format,*intformat,*realformat,*if). If they are not specified, the program will print a character string. It is mandatory to write one of them within an expression, except for strcmp and strcasecmp. The numeration must start with the number 1.
...
- *IntvData. The only difference between this and the previous command is that the field must be one of those fields varying with the interval (see Problem and intervals data file (.prb)). This command must be within a loop over intervals (see *loop) and the program will automatically update the suitable value for each iteration.
...
- *MatProp. This is the same as the previous command except that it must be within a loop over the materials (see *loop). It returns the property whose field number or name is defined by its argument. It is recommended to use names instead of field numbers.
If the argument is 0, it returns the material's name.
Note: Using this command without any argument will print all fields
Caution: If there are materials with different numbers of fields, you must ensure not to print non-existent fields using conditionals.
- MaterialLocalNum To get the local material number from its global id or its name.
The local material id is the material number for the calculation file, taking into account the materials applied to mesh elements)
It has a single argument, an integer of the material global number or its name.
Example:
*set var i_material=3
*MaterialLocalNum(*i_material)
*MaterialLocalNum(Steel)
- *ElemsMatProp. This is the same as Matprop but uses the material of the current element. It must be within a loop over the elements (see *loop). It returns the property whose field number or name is defined by its argument. It is recommended to use names instead of field numbers.
...
- *Cond. The same remarks apply here, although now you have to notify with the command *set (see *set) which is the condition being processed. It can be within a loop (see *loop) over the different intervals should the conditions vary for each interval.
...
- *CondName. This returns the conditions's name. It must be used in a loop over conditions or after a *set cond command.
- *CondNumFields. This returns the number of fields of the current condition. It must be used in a loop over conditions or after *set cond
- *CondHasLocalAxes. returns 1 if the condition has a local axis field, 0 else
- *CondNumEntities. You must have previously selected a condition (see *set cond). This returns the number of entities that have a condition assigned over them.
- *ElemsNum: This returns the element's number.
*NodesNum: This returns the node's number.
*MatNum: This returns the material's number.
*ElemsMat: This returns the number of the material assigned to the element.
All of these commands must be within a proper loop (see *loop) and change automatically for each iteration. They are considered as integers and cannot carry any argument. The number of materials will be reordered numerically, beginning with number 1 and increasing up to the number of materials assigned to any entity.
- *FaceElemsNum: must be inside a *loop faces, and print the element's number owner of the face
- *FaceIndex: must be inside a *loop faces, and print the face index on the element (starting from 1)
- *LayerNum: This returns the layer's number.
*LayerName: This returns the layer's name.
*LayerColorRGB: This returns the layer's color in RGB (three integer numbers between 0 and 256). If parameter (1), (2) or (3) is specified, the command returns only the value of one color. RED is 1, GREEN is 2 and BLUE is 3.
The commands *LayerName, *LayerNum and *LayerColorRGB must be inside a loop over layers; you cannot use these commands in a loop over nodes or elements.
Example:
*loop layers
*LayerName *LayerColorRGB
*Operation(LayerColorRGB(1)/255.0) *Operation(LayerColorRGB(2)/255.0) *Operation(LayerColorRGB(3)/255.0)
*end layers
- *NodesLayerNum: This returns the layer's number. It must be used in a loop over nodes.
*NodesLayerName: This returns the layer's name. It must be used in a loop over nodes.
*ElemsLayerNum: This returns the layer's number. It must be used in a loop over elems.
*ElemsLayerName: This returns the layer's name. It must be used in a loop over elems.
- *LayerNumEntities. You must have previously selected a layer (see *set layer). This returns the number of entities that are inside this layer.
- *GroupNum: This returns the group's index number.
*GroupFullName: This returns the full group's name, including parents separed by //. e.g: a//b//c
*GroupName: This returns only the tail group's name. e.g: c (if group's doesn't has parent then is the same as the full name)
*GroupColorRGB: This returns the group's color in RGB (three integer numbers between 0 and 256). If parameter (1), (2) or (3) is specified, the command returns only the value of one color. RED is 1, GREEN is 2 and BLUE is 3.
*GroupParentName: This returns the name of the parent of the current group
*GroupParentNum: This returns the index of the parent of the current group
These commands must be inside a loop over groups, or after set group.
Example:
*loop groups
*groupnum "*GroupFullName" ("*groupname" parent:*groupparentnum) *groupcolorrgb
*set group *GroupName *nodes
*if(GroupNumEntities)
nodes: *GroupNumEntities
*loop nodes *onlyingroup
*nodesnum
*end nodes
*end if
*set group *GroupName *elems
*if(GroupNumEntities)
elements: *GroupNumEntities
*loop elems *onlyingroup
*elemsnum
*end elems
*end if
*set group *GroupName *faces
*if(GroupNumEntities)
faces: *GroupNumEntities
*loop faces *onlyingroup
*faceelemsnum:*faceindex
*end faces
*end if
*end groups
- *GroupNumEntities. You must have previously selected a group (see *set group). This returns the number of entities that are inside this group.
- *LoopVar. This command must be inside a loop and it returns, as an integer, what is considered to be the internal variable of the loop. This variable takes the value 1 in the first iteration and increases by one unit for each new iteration. The parameter elems,nodes,materials,intervals, used as an argument for the corresponding loop, allows the program to know which one is being processed. Otherwise, if there are nested loops, the program takes the value of the inner loop.
- *Operation. This returns the result of an arithmetical expression what should be written inside parentheses immediately after the command. This operation must be defined in C-format and can contain any of the commands that return one single value. You can force an integer or a real number to be returned by means of the parameters INT or REAL. Otherwise, GiD returns the type according to the result.
...
- +,-,*,/,%,(,),=,<,>,!,&,|, numbers and variables
- sin
- cos
- tan
- asin
- acos
- atan
- atan2
- exp
- fabs
- abs
- pow
- sqrt
- log
- log10
- max
- min
- strcmp
- strcasecmp
...
- *LocalAxesNum. This returns the identification name of the local axes system, either when the loop is over the nodes or when it is over the elements, under a referenced condition.
- *nlocalaxes. This returns the number of the defined local axes system.
- *IsQuadratic. This returns the value 1 when the elements are quadratic or 0 when they are not.
- *Time. This returns the number of seconds elapsed since midnight.
- *Clock. This returns the number of clock ticks (aprox. milliseconds) of elapsed processor time.
...
- *Units('magnitude'). This returns the current unit name for the selected magnitude (the current unit is the unit shown inside the unit window).
...
- *FactorUnit('unit'). This returns the numeric factor to convert a magnitude from the selected unit to the basic unit.
Example:
*FactorUnit(PRESSURE)
- *FileId returns a long integer representing the calculaton file, written following the current template.
This value must be used to provide the channel of the calculation file to a tcl procedure to directly print data with the GiD_File fprintf special Tcl command.
PROBLEMTYPE 'CLASSIC'>Template files>Commands used in the .bas file>Multiple values return commands
These commands return more than one value in a prescribed order, writing them one after the other. All of them except LocalAxesDef are able to return one single value when a numerical argument giving the order of the value is added to the command. In this way, these commands can appear within an expression. Neither LocalAxesDef nor the rest of the commands without the numerical argument can be used inside expressions. Below, a list of the commands with the appropriate description is displayed.
- *NodesCoord. This command writes the node's coordinates. It must be inside a loop (see *loop) over the nodes or elements. The coordinates are considered as real numbers (see *realformat and *format). It will write two or three coordinates according to the number of dimensions the problem has (see *Ndime).
If *NodesCoord receives an integer argument (from 1 to 3) inside a loop of nodes, this argument indicates which coordinate must be written: x, y or z. Inside a loop of nodes:
*NodesCoord writes three or two coordinates depending on how many dimensions there are.
NodesCoord(1) writes the *x coordinate of the actual node of the loop.
NodesCoord(2) writes the *y coordinate of the actual node of the loop.
NodesCoord(3) writes the *z coordinate of the actual node of the loop.
If the argument real is given, the coordinates will be treated as real numbers.
Example: using *NodesCoord inside a loop of nodes
Coordinates:
Node X Y
*loop nodes
*format "%5i%14.5e%14.5e"
*NodesNum *NodesCoord(1,real) *NodesCoord(2,real)
*end nodes
This command effects a rundown of all the nodes in the mesh, listing their identifiers and coordinates (x and y).
The contents of the project_name.dat file could be something like this:
Coordinates:
Node X Y
1 -1.28571e+001 -1.92931e+000
2 -1.15611e+001 -2.13549e+000
3 -1.26436e+001 -5.44919e-001
4 -1.06161e+001 -1.08545e+000
5 -1.12029e+001 9.22373e-002
...
*NodesCoord can also be used inside a loop of elements. In this case, it needs an additional argument that gives the local number of the node inside the element. After this argument it is also possible to give which coordinate has to be written: x, y or z.
Inside a loop of elements:
*NodesCoord(4) writes the coordinates of the 4th node of the actual element of the loop.
NodesCoord(5,1) writes the *x coordinate of the 5th node of the actual element of the loop.
NodesCoord(5,2) writes the *y coordinate of the 5th node of the actual element of the loop.
NodesCoord(5,3) writes the *z coordinate of the 5th node of the actual element of the loop.
- *ElemsConec. This command writes the element's connectivities, i.e. the list of the nodes that belong to the element, displaying the direction for each case (anti-clockwise direction in 2D, and depending on the standards in 3D). For shells, the direction must be defined. However, this command accepts the argument swap and this implies that the ordering of the nodes in quadratic elements will be consecutive instead of hierarchical. The connectivities are considered as integers (see *intformat and *format).
If *ElemsConec receives an integer argument (begining from 1), this argument indicates which element connectity must be written:
*loop elems
all conectivities: *elemsconec
first conectivity *elemsconec(1)
*end elems
Note: In the first versions of GiD, the optional parameter of the last command explained was invert instead of swap, as it is now. It was changed due to technical reasons. If you have an old .bas file prior to this specification, which contains this command in its previous form, when you try to export the calculation file, you will be warned about this change of use. Be aware that the output file will not be created as you expect.
- *GlobalNodes. This command returns the nodes that belong to an element's face where a condition has been defined (on the loop over the elements). The direction for this is the same as for that of the element's connectivities. The returned values are considered as integers (see *intformat and *format).If *GlobalNodes receives an integer argument (beginning from 1), this argument indicates which face connectity must be written.
...
- *LocalNodes. The only difference between this and the previous one is that the returned value is the local node's numbering for the corresponding element (between 1 and nnode).
- *CondElemFace. This command return the number of face of the element where a condition has been defined (beginning from 1). The information is equivalent to the obtained with the localnodes command
- *ElemsNnode. This command returns the number of nodes of the current element (valid only inside a loop over elements).
...
- *ElemsNnodeCurt. This command returns the number of vertex nodes of the current element (valid only inside a loop over elements). For example, for a quadrilateral of 4, 8 or 9 nodes, it returns the value 4.
- *ElemsNNodeFace. This command returns the number of face nodes of the current element face (valid only inside a loop over elements onlyincond, with a previous *set cond of a condition defined over face elements).
...
- *ElemsNNodeFaceCurt. This command returns the short (corner nodes only) number of face nodes of the current element face (valid only inside a loop over elements onlyincond, with a previous *set cond of a condition defined over face elements).
...
- *ElemsType: This returns the current element type as a integer value: 1=Linear, 2=Triangle, 3=Quadrilateral, 4=Tetrahedra, 5=Hexahedra, 6=Prism, 7=Point,8=Pyramid,9=Sphere,10=Circle. (Valid only inside a loop over elements.)
- *ElemsTypeName: This returns the current element type as a string value: Linear, Triangle, Quadrilateral, Tetrahedra, Hexahedra, Prism, Point, Pyramid, Sphere, Circle. (Valid only inside a loop over elements.)
- *ElemsCenter: This returns the element center. (Valid only inside a loop over elements.)
Note: This command is only available in GiD version 9 or later.
- *ElemsRadius: This returns the element radius. (Valid only inside a loop over sphere or Circle elements.)
Note: This command is only available in GiD version 8.1.1b or later.
- *ElemsNormal. This command writes the normal's coordinates. It must be inside a loop (see *loop) over elements, and it is only defined for triangles, quadrilaterals, and circles (and also for lines in 2D cases).
If *ElemsNormal receives an integer argument (from 1 to 3) this argument indicates which coordinate of the normal must be written: x, y or z.
- *LocalAxesDef. This command returns the nine numbers that define the transformation matrix of a vector from the local axes system to the global one.
...
- *LocalAxesDef(EulerAngles). This is as the last command, only with the EulerAngles option. It returns three numbers that are the 3 Euler angles (radians) that define a local axes system

...
- *LocalAxesDefCenter. This command returns the origin of coordinates of the local axes as defined by the user. The "Automatic" local axes do not have a center, so the point (0,0,0) is returned. The index of the coordinate (from 1 to 3) can optionally be given to LocalAxesDefCenter to get the x, y or z value.
Example:
*LocalAxesDefCenter
*LocalAxesDefCenter(1) *LocalAxesDefCenter(2) *LocalAxesDefCenter(3)
PROBLEMTYPE 'CLASSIC'>Template files>Commands used in the .bas file>Specific commands
** To avoid line-feeding you need to write **{}, so that the line currently being used continues on the following line of the file filename.bas.
- *# If this is placed at the beginning of the line, it is considered as a comment and therefore is not written.
- **** In order for an asterisk symbol to appear in the text, two asterisks **** must be written.
- *Include. The include command allows you to include the contents of a slave file inside a master .bas file, setting a relative path from the Problem Type directory to this secondary file.
Example:
*include includes\execntrlmi.h
Note: The *.bas extension cannot be used for the slave file to avoid multiple output files.
- *MessageBox. This command stops the execution of the .bas file and prints a message in a window; this command should only be used when a fatal error occurs.
Example:
*MessageBox error: Quadrilateral elements are not permitted.
- *WarningBox. This is the same as MessageBox, but the execution is not stopped.
...
- *loop, *end, *break. These are declared for the use of loops. A loop begins with a line that starts with loop (none of these commands is case-sensitive) and contains another word to express the variable of the loop. There are some lines in the middle that will be repeated depending on the values of the variable, and whose parameters will keep on changing throughout the iterations if necessary. Finally, a loop will end with a line that finishes with *end. After *end, you may write any kind of comments in the same line. The command **break inside a *loop or *for block, will finish the execution of the loop and will continue after the *end line.
...
- elems, nodes, faces, materials, conditions, layers, groups, intervals, localaxes. These commands mean, respectively, that the loop will iterate over the elements, nodes, faces of a group, materials, conditions, layers, groups, intervals or local axes systems. The loops can be nested among them. The loop over the materials will iterate only over the effectively assigned materials to an entity, in spite of the fact that more materials have been defined. The number of the materials will begin with the number 1. If a command that depends on the loop is located outside it, the number will also take by default the value 1.
...
- If the variable is nodes, elems or faces, you can include one of the modifiers: *all, *OnlyInCond,*OnlyInLayer or *OnlyInGroup. The first one signifies that the iteration is going to be performed over all the entities.
The *OnlyInCond modifier implies that the iteration will only take place over the entities that satisfy the relevant condition. This condition must have been previously defined with *set cond.
*OnlyInLayer implies that the iteration will only take place over the entities that are in the specified layer; layers must be specified with the command *set Layer.
*OnlyInGroup implies that the iteration will only take place over the entities that are in the specified group;
group must be specified inside a loop groups with the command *set Group *GroupName *nodes|elems|faces, or *set Group <name> , with <name> the full name of the group.
By default, it is assumed that the iteration will affect all the entities. - If the variable is material you can include the modifier *NotUsed to make a loop over those materials that are defined but not used.
- If the variable is conditions you must include one of the modifiers: *Nodes, *BodyElements, *FaceElements, *Layers or *Groups, to do the loop on the conditions defined over this kind of mesh entity, or only the conditions declared 'over layers' or only the ones declared 'over groups'.
- If the variable is layers you can include modifiers: OnlyInCond if before was set a condition defined 'over layers'
- If the variable is groups you can include modifiers: OnlyInCond if before was set a condition defined 'over groups' (e.g. inside a *loop conditions *groups)
Example 1:
*loop nodes
*format "%5i%14.5e%14.5e"
*NodesNum *NodesCoord(1,real) *NodesCoord(2,real)
*end nodes
This command carries out a rundown of all the nodes of the mesh, listing their identifiers and coordinates (x and y coordinates).
Example 2:
*Set Cond Point-Weight *nodes
*loop nodes OnlyInCond
*NodesNum *cond(1)
*end
This carries out a rundown of all the nodes assigned the condition "Point-Weight" and provides a list of their identifiers and the first "weight" field of the condition in each case.
Example 3:
*Loop Elems
*ElemsNum *ElemsLayerNum
*End Elems
This carries out a rundown of all the elements and provides a list of their identifier and the identifier of the layer to which they belong.
Example 4:
*Loop Layers
*LayerNum *LayerName *LayerColorRGB
*End Layers
This carries out a rundown of all the layers and for each layer it lists its identifier and name.
Example 5:
*Loop Conditions OverFaceElements
*CondName
*Loop Elems OnlyInCond
*elemsnum *condelemface *cond
*End Elems
*End Conditions
This carries out a rundown of all conditions defined to be applied on the mesh 'over face elements', and for each condition it lists its name and for each element where this condition is applied are printed the element number, the marked face and the condition field values.
Example 6:
*loop intervals
interval=*loopvar
*loop conditions *groups
*if(condnumentities)
condition name=*condname
*loop groups *onlyincond
*groupnum *groupname *cond
*end groups
*end if
*end conditions
*end intervals
This do a loop for each interval, and for each condition defined 'over groups' list the groups where the condition was applied and its values.
- *if, *else, *elseif, *endif. These commands create the conditionals. The format is a line which begins with *if followed by an expression between parenthesis. This expression will be written in C-language syntax, value return commands, will not begin with *, and its variables must be defined as integers or real numbers (see *format, *intformat, *realformat), with the exception of strcmp and strcasecmp. It can include relational as well as arithmetic operators inside the expressions.
...
- *for, *end, *break. The syntax of this command is equivalent to *for in C-language.
*for(varname=expr.1;varname<=expr.2;varname=varname+1)
*end for
The meaning of this statement is the execution of a controlled loop, since varname is equal to expr.1 until it is equal to expr.2, with the value increasing by 1 for each step. varname is any name and expr.1 and expr.2 are arithmetical expressions or numbers whose only restrictions are to express the range of the loop.
The command *break inside a *loop or *for block, will finish the execution of the loop and will continue after the *end line.
Example:
*for(i=1;i<=5;i=i+1)
variable i=*i
*end for
- *set. This command has the following purposes:
- *set cond: To set a condition.
- *set Layer "layer name" *nodes|elems: To set a layer.
- *set Group "group name" *nodes|elems|faces: To set a group. (inside a *loop groups can use *GroupName as "group name" ,to get the name of the group of the current loop)
- *set elems: To indicate the elements.
- *set var: To indicate the variables to use.
...
- *intformat, *realformat,{*}format. These commands explain how the output of different mathematical expressions will be written to the analysis file. The use of this command consists of a line which begins with the corresponding version, intformat, *realformat or *format (again, these are not case-sensitive), and continues with the desired writing format, expressed in C-language syntax argument, between double quotes ("{*}).
...
- To left align the result
To prefix the numerical output with a sign ( or -) - To force the real output value to contain a decimal point.
The most usual representations are integers and floats. For integers the letters d and i are available, which force the data to be read as signed decimal integers, and u for unsigned decimal integers.
For floating point representation, there are the letters e, f and g, these being followed by a decimal point to separate the minimum width of the number from the figure giving the level of precision.The number of digits after the decimal point depends on the requested level of precision.
Note: The standard width specification never causes a value to be truncated. A special command exists in GiD: *SetFormatForceWidth, which enables this truncation to a prescribed number of digits.
For string representations, the letter s must be used. Characters are printed until the precision value is reached.
The following are valid examples of the use of format:
*Intformat "%5i"
With this sentence, usually located at the start of the file, the output of an integer quantity is forced to be right aligned on the fifth column of the text format on the right side. If the number of digits exceeds five, the representation of the number is not truncated.
*Realformat "%10.3e"
This sentence, which is also frequently located in the first lines of the template file, sets the output format for the real numbers as exponential with a minimum of ten digits, and three digits after the decimal point.
*format "%10i%10.3e%10i%15.6e"
This complex command will specify a multiple assignment of formats to some output columns. These columns are generated with the line command that will follow the format line. The subsequent lines will not use this format, and will follow the general settings of the template file or the general formats: *IntFormat, *RealFormat.
- To left align the result
- *SetFormatForceWidth, *SetFormatStandard The default width specification of a "C/C+" format, never causes a value to be truncated.
...
- *Tcl This command allows information to be printed using the Tcl extension language. The argument of this command must be a valid Tcl command or expression which must return the string that will be printed. Typically, the Tcl command is defined in the Tcl file (.tcl , see TCL AND TK EXTENSION for details).
...
- The text is reproduced literally, without printing instructions, as it is write-oriented.
- There are no indices in the loops. When the program begins a loop, it already knows the number of iterations to perform. Furthermore, the inner variables of the loop change their values automatically. All the commands can be divided into three types:
- Commands that return one single value. This value can be an integer, a real number or a string. The value depends on certain values that are available to the command and on the position of the command within the loop or after setting some other parameters. These commands can be inserted within the text and write their value where it corresponds. They can also appear inside an expression, which would be the example of the conditionals. For this example, you can specify the type of the variable, integer or real, except when using strcmp or strcasecmp. If these commands are within an expression, no *** should precede the command.
- Commands that return more than one value. Their use is similar to that of the previously indicated commands, except for the fact that they cannot be used in other expressions. They can return different values, one after the other, depending on some values of the project.
- Commands that perform loops or conditionals, create new variables, or define some specifications. The latter includes conditions or types of element chosen and also serves to prevent line-feeding. These commands must start at the beginning of the line and nothing will be written into the calculations file. After the command, in the same line, there can be other commands or words to complement the definitions, so, at the end of a loop or conditional, after the command you can write what loop or conditional was finished.
...